Newsletter
How to register on Launch X-431 Pro MINI
Matched product:

Launch X431 Pro Mini Bluetooth with 1 years Free Update Online Full System Diagnosis Support Actuation Test
Latest price:£689£60412% off
- Item No. SP291
- Free Shipping
Launch X431 Pro Mini can provide full system diagnostic and other 11 Special Functions, support more than 108 US, Asian and European vehicle makes and models, as well as 12V SUVs,minivans, light-duty trucks, it is better than X431 Diagun III/ X431 IV, X431 Pro Mini taking advantage of mobile internet.
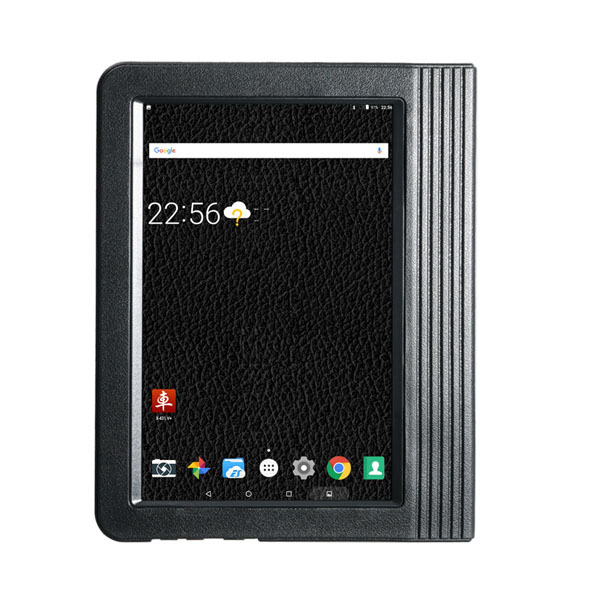
X431 V 8inch vs x431 Pro mini vs x431 v+
How to register on Launch X-431 Pro MINI
X431 V 8inch vs x431 Pro mini vs x431 v+:
How to register on Launch X-431 Pro MINI
| X431 V 8inch vs x431 Pro mini vs x431 v+: | |||
| Picture | 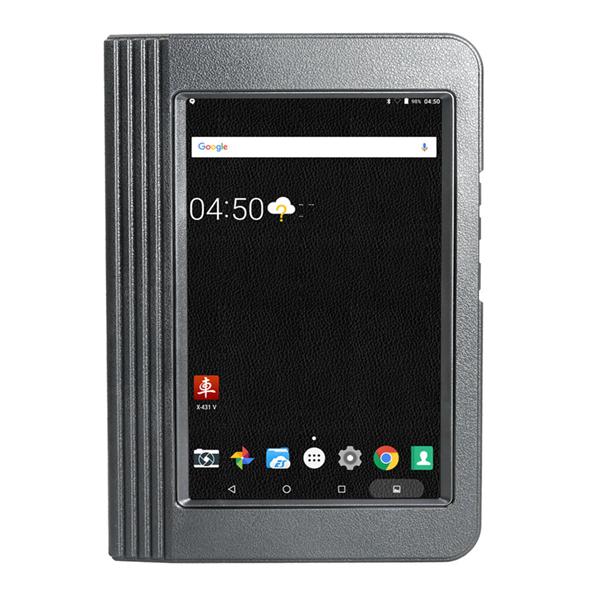 |
 |
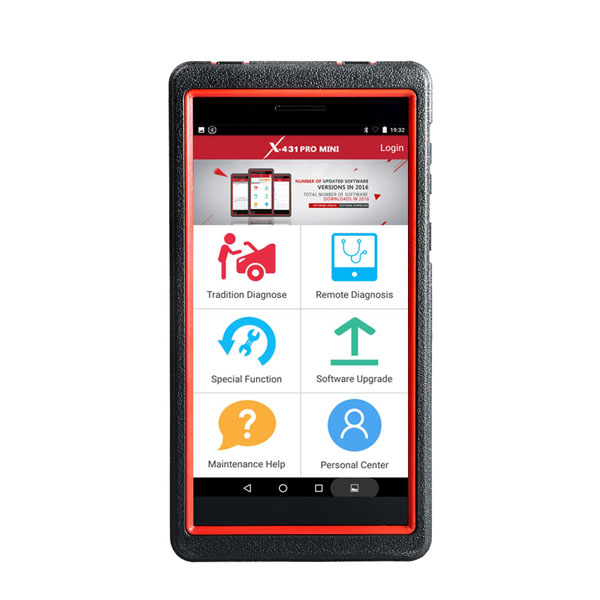 |
| Item | X431 V 8 inch | Launch X431 V+ 10.1 inch | Launch X431 Pro Mini |
| Item No. | SP183-D | SP184 | SP291 |
| OS | Android 7.1 | Android 7.1 | Android 5.1 |
| SIZE | 8” 1280 x 800 IPS display with 189 ppi |
10.1-inch Tablet | 6.9 inch 1280 x 720 |
| CPU | Quad-core 1.4GHz | quad-core 1.4 GHz | Quad-core 1.3 GHz |
| RAM | 2 GB | 2GB | 2GB |
| Capacity (internal / SD card) | 16GB (expandable by up to 32 GB) |
16GB | 16GB |
| Battery | 4850mh rechargeable polymer lithium battery |
7000 mAh | 3.7V/3000mh rechargeable polymer lithium battery |
| Pixels | No Front camera and rear-facing 5 MP camera with 1080p HD video recording |
No Front camera/ Back 5mp | Front-facing 2MP camera + rear-facing 5MP camera |
| Update | one-click update online for 2 years free |
one-click update online for 2 years free | one-click update online for 2 years free |
How to register on Launch X-431 Pro MINI
Here is the procedure of Launch X-431 Pro MINI User registration, the steps as shown below:
Tap “Login” on the upper right corner of the main menu screen:
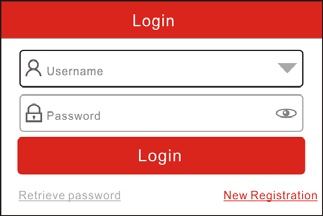
1. If you are a new user, tap “New Registration”, like the picture below:
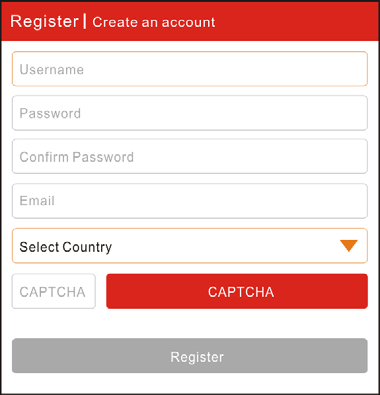
Note: To obtain better service, you need to provide real information.
A. Create App account: In "Register/Create an account" Screen, fill in the information in each field and then tap “Register”, a screen similar to the following will appear:
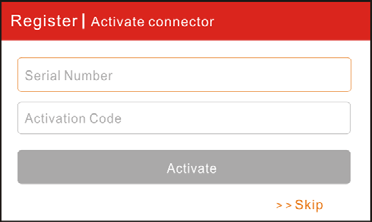
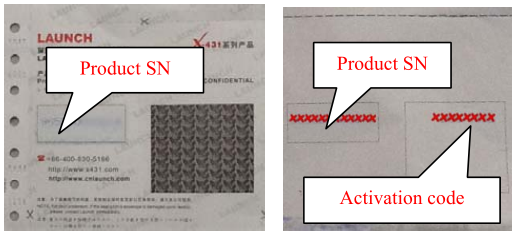
B. Activate the VCI module: In "Register/Activate connector" Screen, input the Serial Number and Activation Code, which can be found in the password envelope.
Note: To exit and activate it later, tap “Skip”. In this case, you can activate your connector by tapping “Activate Connector” in “Personal Center”. For details, please refer to the Chapter 4.10.3 Activate Connector in the user manual.
C. Download diagnostic software: Tap “Activate”, a dialog box similar to the below shows:
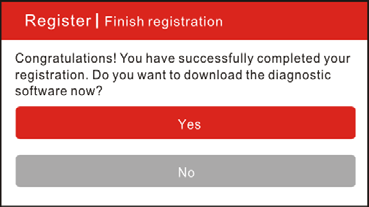
To download the diagnostic software, tap “Yes” to enter the software download page. Tap “No” to download it later.
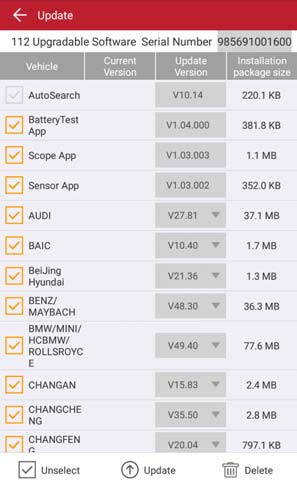
On the download page, tap “Update” to start downloading. It may take several minutes to finish it, please be patient to wait. To pause downloading, tap “Pause”.
To resume it, tap “Continue”.
Once the download is complete, the system will install the software package automatically.
2. If you have registered to be a member, input your name and password, and then tap the “Login” button to enter the main menu screen directly.
3. If you forgot the password, tap “Retrieve Password”, and then follow the on-screen instructions to retrieve it.
More detailed info, please check Launch X431 Pro MINI Manual
Launch X431 Pro Mini FAQ:
1. How to save power?
a) Please turn off the screen while X-431 PRO MINI keeps idle.
b) Set a shorter standby time.
c) Decrease the brightness of the screen.
d) If WLAN connection is not required, please turn it off.
e) Disable GPS function if GPS service is not in use.
2. What should I do in case I forgot the screen lock?
You can set screen lock as pattern or password. If you forgot the password,please consult your device provider or reset your device.
Warning: Resetting may cause data loss. Before use, please make sure important?data has been backed up.
3. How to do if the system runs slow?
In this case, please do the followings:
> Check all running applications and stop the unnecessary applications (Steps: Settings -> Apps -> Running -> Tap the desired application and then tap "Stop").
> Check all installed applications, remove the unnecessary applications (Steps: Settings -> Apps -> Downloaded -> Tap the desired application and then tap "Uninstall").
If all steps mentioned above are finished and the system still works slowly.
Please try to close the system and reboot your X-431 PRO MINI.
4. How to reset X-431 PRO MINI?
Resetting may cause data loss. Before doing so, please make sure important data and information has been backed up.
Do the following to reset X-431 PRO MINI:
1. Tap "Settings" -> "Back & Reset"
2. Tap "Factory data reset"
3. Tap "Reset tablet"
4. Tap "Clear all data" to start resetting until the tool automatically reboots.
5. Why some videos on the website can be not played?
It possibly results from:
1). The current browser does not support Flash playing;
2). Flash player does not support this video.
Try to use other browsers to watch it or install other Flash player.
6. The date and time of X-431 PRO MINI cannot be set.
It is because Automatic date & time is set on your X-431 PRO MINI. Tap"Settings" -> "Date & time", deselect "Automatic date & time" and then set the date and time manually. Since the diagnostic reports are saved and sorted by date, please make sure the system date and time is properly configured on this tool.
7 :How to handle when you encounter "Insufficient storage space"?
If this happens while downloading the diagnostic software, please proceed as follows:
1. Get your X-431 PRO MINI username and password ready. If you forgot thepassword, please dial our hotline to retrieve it with the product serial number 98539*******.
2. Reset the X-431 PRO MINI to the default factory settings (For details, please refer to Item 5 in this Chapter).
3. Tap "Settings" --> "WLAN", choose the desired WLAN network to connect.
4. Open the browser and visit www.dbscar.com to download and install the latest App.
5. After the installation is complete, launch the application and login with your username and password.
6. Tap -->"Update" to download the diagnostic software.
Note: For new App, the software structure and storage space occupied by the vehicle softwares have been optimized so as to avoid the occurrence of insufficient storage.
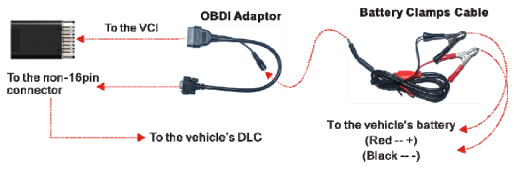
8.How to Connect Launch X431 Pro Mini to Vehicle:
Preparation:
Normal testing conditions
1.Turn on the vehicle power supply.
2.Vehicle battery voltage range should be 9-14 Volts.
3.Throttle should be in a closed position.
Select the VCI module
If X-431 PRO MINI is testing vehicles equipped with universal OBD II 16 PIN diagnostic socket, please use the included VCI module. (For vehicles with non-OBD II 16 PIN diagnostic socket, a non-16 PIN connector is required.)
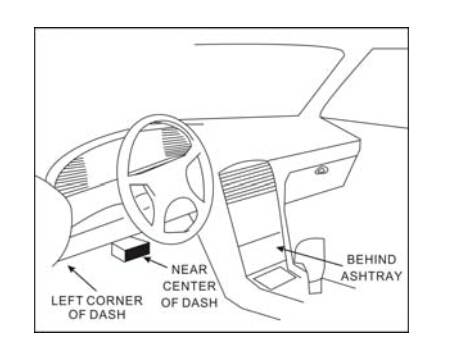
DLC location
The DLC (Data Link Connector) is typically a standard 16-pin connector where diagnostic tools interface with a vehicle's on-board control modules. The DLC is usually located 12 inches from the center of the instrument panel, under or around the driver's side for most vehicles. If DLC is not located under dashboard, a label should be there telling location. For some Asian and European vehicles,the DLC is located behind the ashtray and the ashtray must be removed to access the connector. If the DLC cannot be found, refer to the vehicle's service manual.
9. Follow the steps mentioned below to connect OBD II vehicle:
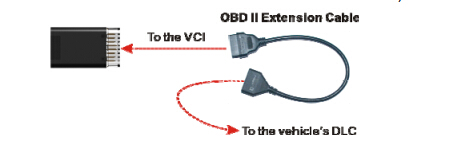
1. Locate vehicle's DLC socket.
2. Plug the VCI module into the vehicle's DLC socket (It is suggested to use the OBD II extension cable to connect the VCI module and DLC socket.).
3. Choose one of the two ways to obtain power from:
A. Power adaptor: Connect one end of the included power adaptor to DC IN port of X-431 PRO MINI tablet, and the other end to AC outlet.
B. Internal battery pack
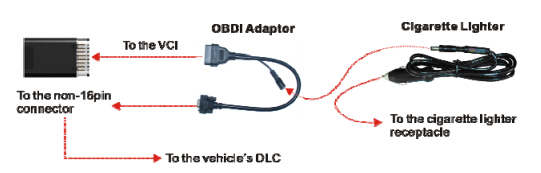
For non-OBDII vehicle, proceed as follows:
1. Locate vehicle's DLC socket.
2. Select the corresponding non-16pin connector.
3. Plug the non-16pin end of the connector into the DLC socket, then connect the other end to the OBD I adaptor, and then tighten the captive screws.
4. Connect the other end of the adaptor to the included VCI module.
5. To supply power to OBD I adaptor from:
A. Cigarette Lighter cable(optional): Connect one end of the cigarette lightercable to vehicle's cigarette lighter receptacle, and the other end to the power jack of OBD I adaptor.
B. Battery Clamps Cable: Connect one end of the battery clamps cable to vehicle's battery, and the other end to the power jack of OBD I adaptor.